This is a page for the World War I detail parts I'm designing for electric R/C models. I decided to start this project because of the lack of detail parts for the WWI scale models I've worked on like the Cleveland Plans built Fokker D-VIII I'm working on or the Dare Fokker D-VIII that I built in 2001.
These parts are meant to be 'sport scale' parts for electric models. That means that they're reasonable representations of their full-scale counterparts and are made to be as light as possible. To do this they're made mostly from laser-cut balsa with some small parts being made of plastic or thin plywood where necessary. It's my hope that I will eventually offer these at my commercial site Wright Brothers R/C in 1/8, 1/10 and 1/12 scale. These scales should be useable for Speed 600, Speed 400 and GWS powered scale WWI models respectively.
Parabellum kits are in production! See them here: http://www.wrightbrothersrc.com/gallery/parabellum.htm
June 11, 2007
Wow, how time goes by fast. Set the way-back machine for 3.5 years in the future Sherman! Well I finally succeeded in purchasing my own Laser engraver for Wright Brothers R/C, and I can get back to all the projects that I've been wanting to finish. First up, finishing up the Lewis guns. These should be for sale over at Wright Brothers R/C within a week or two.


January 13, 2004

First prototypes of the Lewis guns came back from the laser cutters. I have do do some modifications to my CAD files since some parts are too small to be strong enough, and there are some places where my drawings caused the laser to 'rasterize' and cut so slowly that it chars the wood creating too large of a kerf. Second version has been sent to the laser cutter for prototyping.


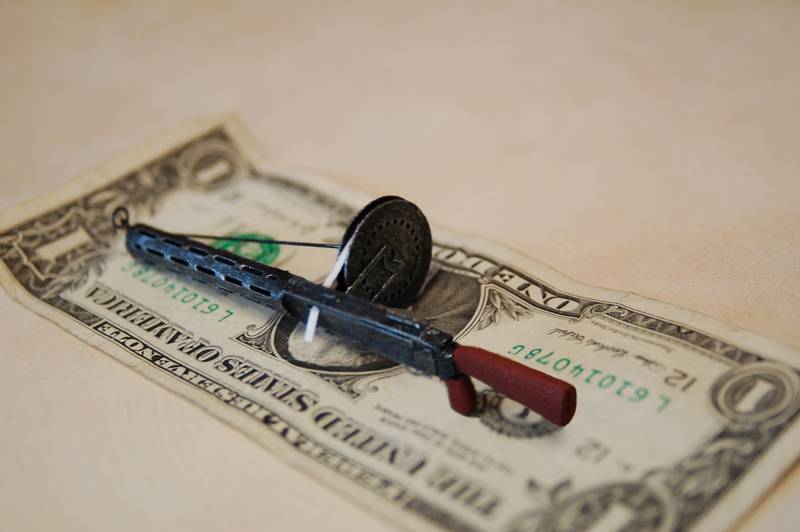
August 5, 2003
Beta kits ready to be mailed to my beta testers. Should go out on Monday.
August 4, 2003
I have completed building up the prototype Spandau guns and they are looking great! Weight is 2 grams each assembled and painted. Assembly was a little 'fiddly' because I hadn't worked out the proper order in which to assemble the parts, but once I got that figured out they went together quickly.
Photos below show the general assembly process. One lesson I learned the hard way is that it's much easier to paint the barrel before you put on the cooling jacket. Also spraying the cooling jacket with rubbing alcohol, and then pre-shaping it by carefully wrapping it aroune a round object (I used a Bic pen) helped a lot. Guns were painted with acrylic model paints brushed on. First a black base coat, the silver was dry-brushed over the whole gun bringing out the detail.


 Return to Al's Electric RC Page